
Table of contents:
1. Bra att veta
2. Ikoner
3. Inloggning
4. Logga in via webbläsaren
5. Wondr Wall
6. Inställningar
7. Användare
8. Schema
9. Rapporter
NOTE:
Each chapter can be relatively large, e.g. Users. A tip is to go through the entire chapter quickly and then look at what you need.
Good to know
If you want to report an error or ask a question regarding the system, you can click Help in the bottom right corner and follow the instructions on the screen.
In this basic walkthrough, we will look at the most common settings, we will not look at optional modules except for the Booking module. The text provides short explanations, the videos demonstrate it visually, and you will find relevant links to the help center at the bottom of each chapter.
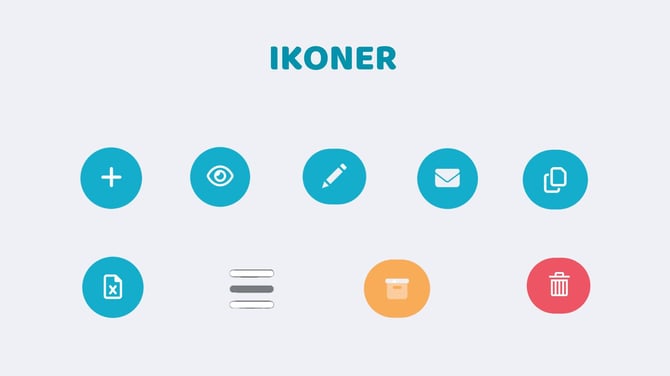
Found to the right of what you want to open
3. Pen = edit something
Change something existing, found on the right
4. Envelope = create a mailing
Will send to the people who are filtered, found in the upper right corner
5. Two sheets of paper on top of each other = copy something
A way to create an exact copy to edit and from that save something new
6. Paper with an X on it = download to Excel
Found in the upper right corner, there is also a choice for CSV
7. Three lines/Card with three lines = open a menu
Can be both three lines or a small icon with three lines on the left
8. Archive box = archive something
Archive something to be able to reuse or just hide
9. Trash can = delete something
Important to remember! Never throw away something that is active, e.g. if there are customers on a membership or the booking type is in the schedule, it should not be deleted.
Confirm when you create or change something
If you make any changes or create something new in Wondr, you must always scroll to the bottom of the page and confirm with the button. The button may say Save, Update or Create
Login
Login can be done both via Web and app
2.Fill in your login details
Browser
2.Fill in your personal login details
Forgot your password?
If you have forgotten your password, you will find a reset link via the login page (both via web and app). When you click on the link, an auto-generated password will be sent to the email address you provided when registering.
Member of multiple facilities or switch users in the app
If you are a member of multiple facilities or have multiple customer profiles, such as your child's or your company's, you can switch between those accounts in the app by clicking on the three lines at the bottom and then clicking on Switch user. Then click on the person icon with a + and you can then log in to the other facility/profile, which will create a shortcut so you can easily switch between facilities/profiles.
WondrWall
Here you publish an inviting image and personally welcome the user by entering a code under Settings so the system retrieves the name.
You can create your own information boxes and a shortcut button below the welcome text, the settings for which are described in the Settings chapter. If you would like more shortcut buttons, please contact support.
Administrator and staff menu
Via the three lines/icon with three lines you can access the modules that you have access to. It looks different depending on what modules have been added via the agreement and what authorization/role you have in the system.
Settings
As an administrator, you have the ability to make settings and create memberships, for example. Staff do not have access to the Settings module by default.
Settings - Analytics
Here you have the option to enter, for example, Google Analytics ID. If you want to activate the Analytics module, please contact support. We do not have support for that module, but you are welcome to contact our partner.
Settings - Permissions
We do not recommend granting Report permissions to staff or members primarily in view of GDPR, but the option is available if desired.
Settings - Payments & Shopping Cart
Here you connect Stripe, Epassiknappen and Fortnox and add manual payment methods under Payment Methods. If you have Payment Methods activated and add a new payment method, it is IMPORTANT to connect it to an accounting account!
If you want to offer discount codes on one-time payments or a discount on the first payment of a recurring payment, you use Promotional Codes. If you want to discount a recurring membership, you create a membership via Settings - Customers - Membership Types and use the Promotional Code inside the membership. A Promotional Code that is created in Payments & Shopping Cart is used in the last step of the checkout and a Promotional Code that is created in a membership is used where you purchase a membership.
Settings - Booking
Here you make basic booking settings, review what applies to your facility and don't forget to click Update at the bottom if you make any changes.
Through Flows, you can break away from the usual group schedule and publish on WondrWall or elsewhere.
Locations are a setting that must be made in order for the sessions to be added to the schedule. If you only have one location/room, you can name the location after the facility's name.
NOTE! Locations do not refer to multiple facilities (unless you have multiple facilities in your agreement, that is)
Through Resources, you can let the member choose, for example, equipment when booking. You can also use Resources to, for example, block time if there are several activities held in the same room, for example, several masseurs share a massage room, then you make the room a resource.
It is under the Types card that you create everything that you want to put in the schedule, and then there are both things that are bookable by customers and things that only staff should see.
You can overwrite the general rules that you set directly via Settings for each Booking Type. You can also create Booking Types that are posted as bookable blocks, we call these Floating Booking Times.
The Booking Type that does not have a trash can to the right of it is the type we call Fallback. It cannot be added to the schedule but is used if the member does not have a booking and checks in, then the member will be checked in to Gymträning which is Fallback.
Settings - Branding
Here you customize Wondr to become your Wondr, add your logo, other colors, fonts and more.
Settings - Homepage
If you don't have a website via Wondr, you can download links and shortcodes for Wordpress here to easily integrate Wondr on your website.
Settings - Contents
In Content you can create information boxes that you can publish in different places in the system, including on WondrWall. If you have a longer text or want to create an information page that will generate a URL, use Pages instead.
Settings - Communication
Here you set what texts, Notification texts, are sent out from the system and whether customers should be able to change how they receive their notifications or if you need to add a new one, Notification types.
Under Email you can create new welcome emails and inspect and change templates.
Settings - Customers
Here you will find Registration Settings for things related to customers and creating your memberships here. Look through the page and change it to suit your facility, don't forget to Update if you have changed anything.
You can use groups to easily filter out a group of users in, for example, Reports or under Users.
If you use Membership Categories, you can visually sort the memberships where they are published in different categories; a membership can be in multiple categories.
In Membership Types, you create all types of memberships, such as prepaid cards such as clip cards, memberships with monthly withdrawals, or memberships without charge.
Settings - Products
This module is used to sell other Products (not memberships) such as gift cards, clothing, supplements, exercise equipment.
Settings - SMS
It is possible to send SMS messages from the system. We never enable this feature as it incurs an additional cost that is billed later.
Each SMS costs SEK 0.79, but a message can consist of multiple SMS messages depending on how long it is and whether special characters have been used.
Settings - Terms & Agreement
It is important that you have your Terms and Conditions published before you start registering customers or selling memberships.
There is also the option for you to publish your own Terms & Conditions and they do not have to be mandatory if you do not wish to.
Settings - WondrWall
Here you make settings to personally welcome the user, you can add a nice background image and also a shortcut button that ends up right below the personal greeting.
Text that starts with $(and ends with) is code that helps the system retrieve information. It is therefore important not to change anything in the code for it to work.
Link to article
You can access all customer information via user profiles.
Here you can access customer profiles and administer customer matters.
Add a user manually
The most common way is for users to register themselves in the system by purchasing a membership or a place in a form. If you need to help a customer register or you want to set up a company, go to Users in the admin menu and click + in the top right corner.
There you will be taken to a registration form and can fill in personal/company information, set roles/authorizations in the system, send a welcome email, and indicate whether they should accept your terms and conditions when they log in for the first time.
Edit user details and notes
Here you can edit the user's personal information. They can edit their name, address and phone number themselves, but if their email address has changed or their social security number has become incorrect, you will need to help.
You can also add notes to the profile, it's not something the customer sees unless they request an extract of what's saved about them. But since Wondr is not a journal system, it's important to keep GDPR in mind when adding notes.
User - Checkout
It is possible to charge for things that are not from memberships or bookings in Wondr. Via Checkout you can retrieve Products (Settings- Products) or add manual order lines.
Wondr is not a cash register, which means that all orders are linked to a user profile.
Video not found
User - Bookings
Here you get an overview of the user's Bookings, these are all bookings that have been linked to the user profile. In the list you see the date if the pass is checked in or cancelled, you see which membership was used when booking or if it is an order linked.
Users - Check-ins
Here you get an overview of the check-ins the user has made, you also see if they received an error message.
User - Pottkonto
Pottkonto is used to manage Friskvård pots and Gift Cards
User - Password
If the customer needs help setting a new password or if you want to resend the welcome email, do this.
Users - Roles
Under the Roles button, you can change permissions for users in the system.
Users - Groups
If you use the Groups function to filter out different groups of users in, for example, Reports, you add the groups here.
User - Log
In the log you can see what happened to the user and see who did what.
User - Order Summary
If the customer needs an order summary, users can only take out one receipt at a time, so here you can choose what you want to include on the Order Summary and add any extra certificate text if needed.
User - Notifications
Under the Notifications button, you can see how the user has chosen to receive their notifications and change those settings.
User - Exporting data
If the customer wants to know what is registered about the person in Wondr (according to GDPR), they can use the Export data button to download the data via Excel or a time-limited link.
User - Terms & Agreement
Here you will find which Terms & Conditions the user has accepted.
Users - Delete users
The button does exactly what it sounds like, Delete user. If you delete a user but then change your mind, you have 30 days to retrieve the user again (via Reports- All users and filter on Deleted). But after 30 days, all history disappears except for the personal data on the orders, which must be saved according to the Accounting Act.
User - Orders
All the user's Orders are managed here. There are 4 tabs, under Upcoming we find planned payments. How many we see depends on the membership settings, the most common is 6 or 12. Here you can activate them early, postpone processing or add something.
When an order is under Processing, the payment process has started and the system will try to withdraw money from the Default payment method unless otherwise specified.
Failed orders are those that have not gone through, e.g. when paying by card, the system tries to withdraw money 6 times before the order ends up under Failed. If no payment method is specified, they also end up here. An order that is under Failed generates a mailing to the user and the payment must be handled by the user or staff. All orders that are under Failed can be found under Reports - Finance - Failed payments.
Under Purchased orders we find those that are registered as paid, from here we can credit or partially credit orders.
Cancelled orders are, as it sounds, cancelled or not executed.
User - Crediting
User - Installment Plan
The customer cannot create an installment plan themselves, so you need to help with that.
User - Bookings
Here is an overview of all the user's Bookings, with information about which membership or order is linked and the status of the booking.
Video not found
User - Payment methods
Here you will find the customer's entered payment methods. If they have entered several, the payment method with a colored check mark (the top one) is the default. The customer cannot enter direct debit and invoice themselves, you must help with that.
User - Membership
Here you can see which active and upcoming Memberships are on the customer's profile. Under the button that looks like a clock with a back arrow, you can see which memberships they have had before, and activate them again. Under + there is the option to add new memberships if they have the Sales channel staff set to the membership. As staff, you have the option to Customize, individualize prices, start date, payment start or other payer, or Choose, then it will be added with the settings and price that are set. The memberships are found under the Membership Group they are in.
Links to help articles
Sälja medlemskap via receptionen - Gå till kapitel Boka in via kundprofil
Via Schedule you can create and edit sessions, as well as manage bookings. You can choose whether you want to work in a List Schedule or a Weekly Schedule. And use Mass Editing to easily change booking type, instructor, location, etc. on multiple schedule entries at once.