
- Requirements
- Which type of campaign do you want to run?
- Use campaigns
- What happens when you activate and finish?
- Use the campaign in ads
- Tracking and Analytics
- Check that it works
- Troubleshooting
- Related articles
Requirements
A campaign is a page of its own that you build from blocks, for example headings, text, images, buttons and forms. You share the campaign with a link. Visitors see the campaign without Wondr's usual menu.
Which version do you have?
Which version of Marketing hub you have depends on which package you have in Wondr.
| Version | Included in package | What you can do |
| Marketing Hub GO | Base and Core | You can use all premade campaigns and layouts and create campaigns from scratch. You can have one active campaign at a time and as many drafts as you want. Webpage is not included. |
| Marketing Hub Complete | Pro and Hero | You can use all premade campaigns and layouts and create campaigns from scratch. You can have as many active campaigns as you want. Webpage is included. |
NOTE: You need Analytics to see statistics for your campaigns.
Who can do what?
By default, Facility admins and Administrators work with campaigns. Staff have no access by default, but you can give Staff permission to work with campaigns. This applies to all versions of Marketinghub.
| What you want to do | Facility admin | Administrator | Staff | Staff |
|---|---|---|---|---|
See the campaigns in Marketinghub > Campaigns |
Yes | Yes | No | No |
| Create, edit, activate, finish and remove | Yes | Yes | No | No |
| Change settings for Marketinghub | Yes, with Marketinghub Complete | Yes, with Marketinghub Complete | No | No |
If you want to save a campaign as a template or lock blocks, none of the roles can do that by default. Contact us if you need it.
TIP! Is a button missing, for example Create new? Ask an Administrator to change your permissions under Settings > Permissions. The permissions are in the Marketinghub group.
A campaign can belong to a single location or to all locations. You can only edit and remove campaigns at locations where you have permission.
Which type of campaign do you want to run?
First decide what the campaign should lead to. That determines which blocks you build with and where you follow up on the results.
| Your goal | Build with | Shows as a conversion in the campaign? |
| Collect leads | Form block, or a Button with the action Add to leads & prospects | Yes |
| Sell a membership directly | The Register block, or a Button with the action Link to registration | No |
| Show information and drive traffic | Text, image, video, staff and buttons with the action Link | No. Visits and clicks are counted. |
Collect leads
You let the visitor leave their details, and you contact the person afterwards. This suits cases where the purchase requires a call or a visit first, for example a trial workout or a company offer.
- Add a Button and choose the action Add to leads & prospects. The button opens a window where the visitor fills in their details.
- You can add a Form instead.
The fields in the window
Four fields are included automatically when you choose the action: First name, Last name, E-mail and Mobile. You do not need to add them yourself.
The visitor must also tick I agree to the handling of my personal data before they can submit.
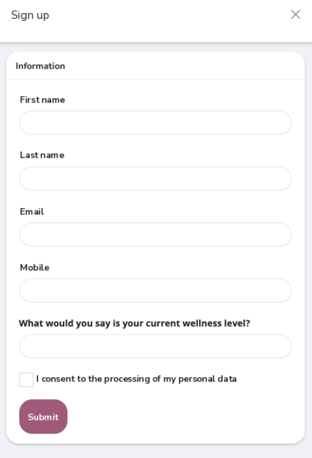
If you want more details, for example which type of training the person is interested in:
- Click the button in the editor and open its settings.
- Click Add field under Extra fields.
- Write a Field label, that is, the heading the visitor sees.
- Choose the Field type: Single row text or Multiple row text.
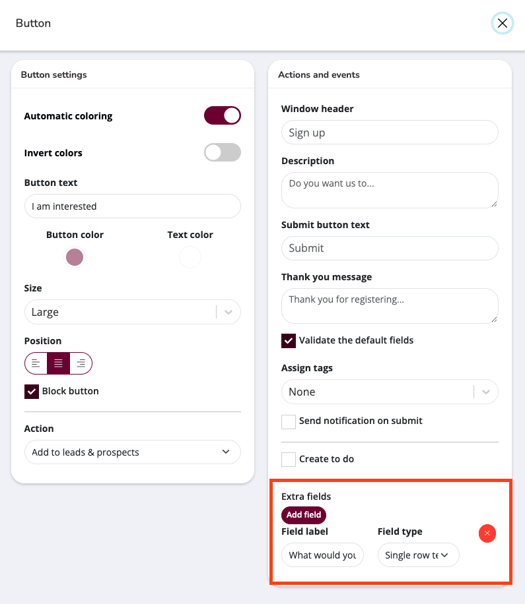
NOTE: Extra fields cannot be made mandatory, and there are only the two field types. This means the visitor can leave them empty.
More settings for the button
- Window header, Description, Submit button text and Thank you message: the texts the visitor sees.
- Assign tags: tags the person gets when they submit.
- Send notification on submit: choose who gets a notification every time someone submits.
- Create to do: creates a task for a selected person in charge, with an action and a message, so that someone contacts the person.
Where do I find the details?
The person is added under Leads & prospects. Wondr also writes the comment Campaign: campaign name on the person, so you can see where they came from. The people are also shown in a list at the bottom of the campaign overview.
Send an automatic message
With Smart rules, Wondr can send a message right away when someone has left their details in the campaign, for example a thank you or information about the next step.
- Go to
Settings > Smart rulesand create a new rule. - Choose the trigger Lead created. It runs when a new lead is created from a campaign.
- If you want the rule to apply to one specific campaign only, add a filter on the Campaign field and choose the campaign.
- Add the action Email under Communicate and write the subject and text. If you have SMS, you can choose SMS instead.
If you also want someone on the staff to know that a new lead has come in, choose the action Notification to other user. There you choose who should get it and whether it is sent as Send as Email, Send as SMS or Send as Push.
NOTE: If you do not see Smart rules under Settings, you lack permission, or the feature is not included in your package.
Sell a membership directly
The visitor buys directly in the campaign without you having to contact the person first.
- Add the Register block. It shows Wondr's registration directly in the campaign, so the visitor can choose and buy their membership without leaving the page. You can decide which memberships are shown and enter a campaign code.
- You can also add a Button with the action Link to registration instead. It sends the visitor to the registration page, with the campaign code filled in if you have entered one. This only works if the membership is hidden behind a code.
NOTE: Sales are not counted as a conversion in the campaign statistics. See how many memberships the campaign has generated in the report on sold memberships.
Combine
You can mix both in the same campaign, for example a membership to buy directly and a button for those who want to be contacted first. Keep in mind that only leads show as a conversion.
Use campaigns
Step 1: Find your campaigns
- Go to
Marketing hub > Campaigns. - Look at the three lists. Each list shows the four most recently changed campaigns:
- Active: campaigns you have activated and not finished.
- Drafts: campaigns you have not activated yet.
- Finished: campaigns you have finished.
- Click All active, All drafts or All finished to see the full list.
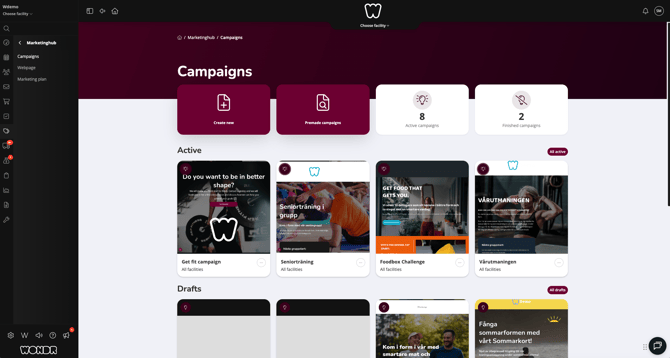
The icon in the corner of the campaign card shows the status. Hold the mouse pointer over the icon to read it. Under the campaign name you can see which location it applies to.
TIP! The lists only show campaigns for the location you have selected. Switch location if a campaign is missing.
Step 2: Create a campaign
- Click Create new.
- Choose how you want to start:
- Create empty: you start with a completely empty page. Confirm with Create campaign.
- Premade layouts: you start from a layout that already has blocks in place.
- Premade campaigns: you start from a premade campaign and replace the texts and images with your own.
- Wondr creates the campaign as a draft and opens it in the editor.
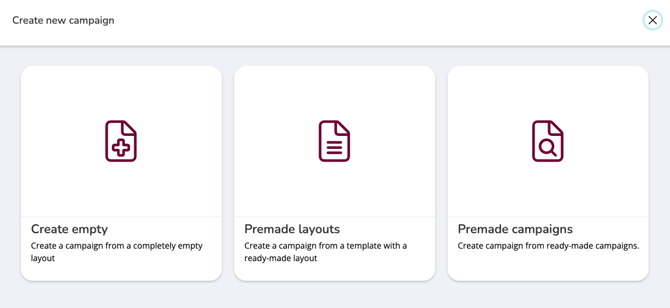
The campaign gets an automatic name, for example Campaign 2026-11-16 14:30, and is linked to the location you are working at. You change the name in the settings (see step 3).
Step 3: Build and set up the campaign
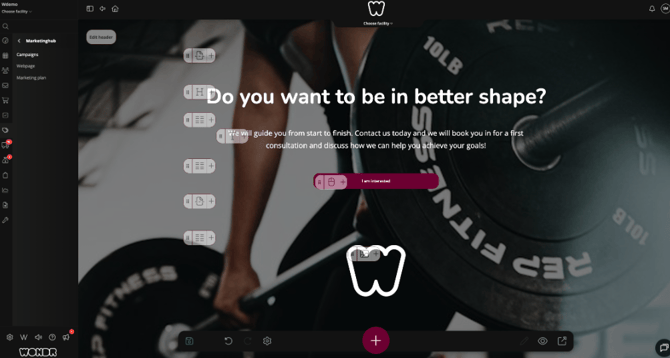
- Click the plus button Add block and choose a block. There are blocks for heading, text, banner, video, button, columns, form, schedule, staff, web shop and booking guide, among others.
- Click a block to change, copy or remove it.
- Click Settings (the cogwheel) and fill in:
- General: name, colors and which location the campaign applies to. Choose All locations if it should apply to all.
- Description & SEO: the title and description shown in the browser and in search results.
- Social media Thumbnail: the image shown when you share the link.
- Scripts: code for tracking. See Tracking and Analytics.
- Switch between Edit mode and Preview mode to see how the campaign looks to the visitor. With Size you can preview different screen sizes.
- Click Save. You can undo and redo changes.
NOTE: Scripts is advanced. Code that you add here runs on the campaign page and can break the campaign if it is wrong. Only use it if you know what the code does.
Step 4: Activate the campaign
- Go to
Marketing hub > Campaignsand click the campaign's card. The campaign overview opens. Scroll to the bottom of the page. - Click Activate campaign.
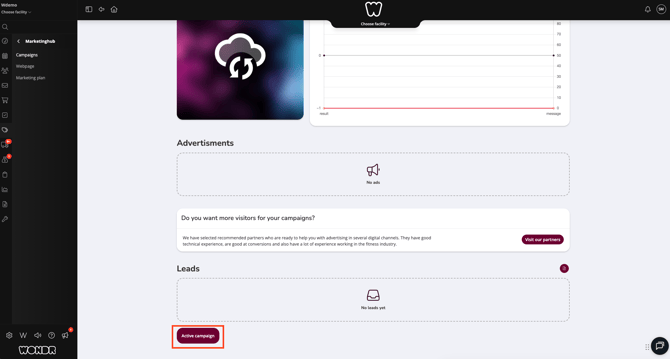
Read more about what happens in the section What happens when you activate and finish
NOTE: If you have Marketing Hub GO, you can only have one active campaign at a time. If a campaign is already under Active, you must finish it first. See Marketing Hub GO: one active campaign.
Step 5: Share the campaign
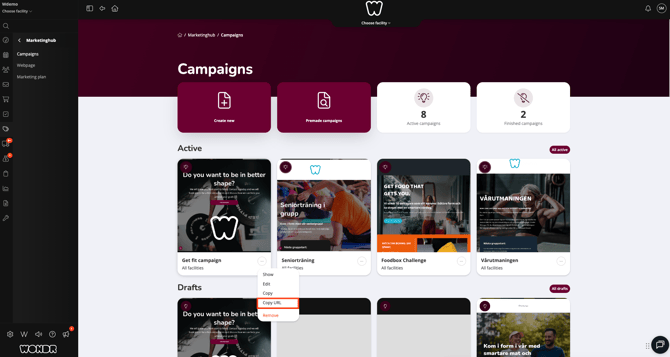
- Click the three dots on the campaign's card.
- Choose Copy URL and paste the link into your mailing, your post or on your website.
- Choose View if you want to open the campaign in a new tab.
Step 6: Copy and remove
- Copy: choose Copy on the campaign's card. The copy gets the addition Copy in the name, becomes a new draft and ends up at the location you are working at.
- Remove: choose Remove on the campaign's card and confirm. The campaign disappears from the lists and can no longer be opened with the link.
What happens when you activate and finish?
A campaign has three states: draft, active and finished. You switch state with the button at the bottom of the campaign overview. The button changes depending on the campaign's state.
| Draft | Active | Finished | |
| Button in the overview | Activate campaign | Finish campaign | Reactivate campaign |
| Is listed under | Drafts | Active | Finished |
| The link for the visitor | Works | Works | Shows Page not found |
| Visits are measured | No | Yes | No |
| Shown on the start page list of active campaigns | No | Yes | No |
When you activate
- Wondr saves today's date and time as the start date.
- The campaign moves from Drafts to Active.
- Wondr starts measuring visits to the campaign. Statistics are counted from the start date.
- The campaign is shown in the list of active campaigns on the start page.
- In smart rules, the campaign gets the text (Active) after the name.
The link does not change. It works just as well before and after you activate. Wondr also does not send anything out to your customers. You share the link yourself.
When you finish
- Wondr saves the end date, and it is shown in the overview.
- The campaign moves from Active to Finished.
- The link stops working. Visitors see Page not found. This also applies to people who have already received the link.
- Wondr stops measuring visits, and the statistics show the period from the start date to the end date.
- The campaign disappears from the list of active campaigns on the start page.
You do not lose anything. The campaign and the statistics remain under Finished, and you can open and edit the campaign.
NOTE: You get a prompt to confirm before the campaign is finished.
When you reactivate
- Wondr removes the end date. The original start date remains.
- The campaign moves back to Active.
- The link works again, and Wondr starts measuring visits again.
Marketing Hub GO: one active campaign at a time
If you have Marketing Hub GO, you can have one active campaign at a time. You can create and edit as many drafts as you want.
If you try to activate or reactivate a campaign while another one is already active, it is not activated. You get a message that one active campaign is the maximum for your package. The message suggests that you upgrade to Pro or Hero, or finish the current campaign first.
Here is how to make room for a new campaign:
- Open the active campaign in
Marketing hub > Campaigns. - Click Finish campaign.
- Open the campaign you want to start and click Activate campaign.
Finished campaigns do not count. You cannot get around the limit by changing the campaign.
NOTE: If you already have several active campaigns, they stay and keep working. You cannot activate more until you have one or fewer active campaigns.
NOTE: Webpage is not included in Marketing Hub GO. If you click Webpage, you see a blurred preview and a message that the feature is not included in your package.
TIP! Do you want to stop a campaign that you have shared? Finish it. The link stops working immediately.
Use the campaign in ads
The campaign is a page in Wondr. Wondr does not create or publish any ads for you on Facebook or Instagram. You create the ad yourself in Meta and use the campaign as the page it links to.
Link the ad to the campaign
- Click the three dots on the campaign's card and choose Copy URL.
- Paste the link as the destination when you create the ad in Meta.
- Check that the campaign is active, so that Wondr measures the visits.
NOTE: If you finish the campaign, the link stops working. Pause the ad in Meta first.
Use premade ad texts and images
If you created the campaign from one of the Premade campaigns, it may have premade ad suggestions:
- Click the campaign's card. The campaign overview opens.
- Go to Advertisments and click an ad card.
- In Ad content, click Copy for the title and for the description. Open the images to save them.
- Paste the texts and upload the images when you create the ad in Meta.
If you see No ads, the campaign has no premade ad suggestions, for example if you created it empty. In that case, you create the ad text and images yourself in Meta.
Follow up with Facebook Pixel
Enter your Pixel ID under Analytic IDs in Settings > Analytics, so that Meta can follow the visitors from your ad. Wondr then sends an event to Pixel when someone clicks a button in the campaign and when someone submits a lead. The visitor must have accepted cookies. Read more in Tracking and Analytics.
Do you want help with advertising?
On the Marketing hub > Campaigns page, you can click Visit our partners, under the heading Do you want more visitors for your campaigns?. There you find recommended partners who help with advertising in digital channels.
Tracking and Analytics
Tracking means that you measure what visitors do on the campaign, for example how many visit it and how many leave their details. There are two ways to do it:
- Analytics: you set it up once and it applies to all your campaigns. This is the simplest way.
- Scripts in the campaign: you add your own tracking code. Use this if you need something that Analytics does not support.
CAUTION: Tracking and Analytics are something you set up and are responsible for yourself, so unfortunately we cannot help with the setup itself, the code or the interpretation of the statistics. Make sure you are confident about what the code does before you add it. If you suspect that something in Wondr is not working as it should, we are happy to take a look, so contact support.
This is what Wondr measures for you
When Analytics is activated and the campaign is active, Wondr measures:
- how many people visit the campaign,
- clicks on buttons in the campaign,
- leads: visitors who submit a form or use a button with the action Add to leads & prospects.
The campaign overview shows four figures:
- Active since: the start date.
- Visits: number of visits since the start date.
- Conversions: number of leads that visitors have submitted.
- Conversion rate: the share of visits that led to a lead.
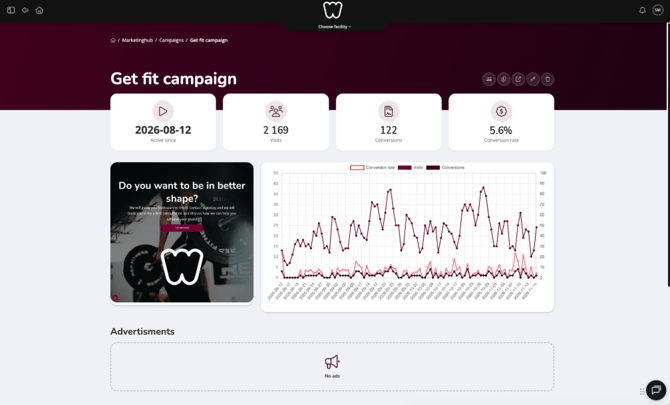
Click the Analytics button at the top right of the overview to see more. There you can choose between visits, groups and events, choose dates and filter on logged-in or logged-out visitors.
NOTE: A conversion is a lead. Sales that happen directly in the campaign, for example in the web shop or through registration, are not counted as a conversion. If you sell memberships directly in the campaign, you see the result in the report on sold memberships. Visits and clicks still show in the campaign statistics.
Set up Analytics
- Go to
Settings > Analytics. - Click Activate Wondr Analytics if it is not already active.
- Fill in your tracking IDs under Analytic IDs. You can enter different IDs per location.
- Google Analytics ID. A Google Tag Manager ID that starts with
GTM-also works. - Facebook Pixel ID and Facebook domain verification code.
- Google Analytics ID. A Google Tag Manager ID that starts with
- If needed, use the field for extra scripts. It runs on all pages that are tracked, and you write plain JavaScript without tags.
- Under Cookie consent you set the text, the button text and the link in the cookie box that the visitor sees. Click Fetch standard text to get the suggestion from Wondr.
- Under Pages to track, Marketing hub - Page view should be ticked. It is by default.
- Save.
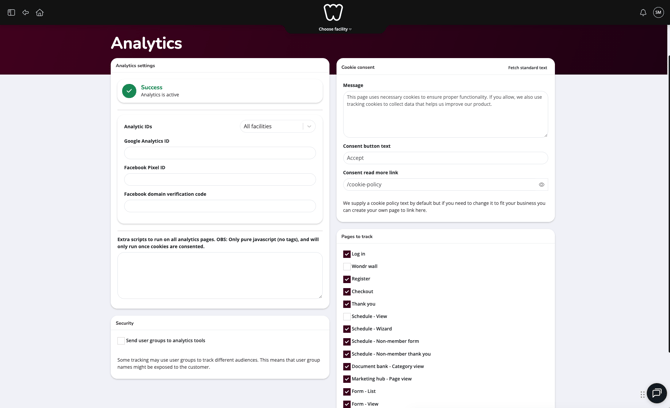
NOTE: Wondr, Google and Facebook only start measuring when the visitor has accepted cookies. If the visitor declines, they do not show in the statistics. This also applies to the extra scripts in Analytics.
Add your own scripts to the campaign
Under Settings > Scripts in the campaign editor there are two fields:
- Head: the code is placed at the start of the page. Paste tracking codes here, for example a pixel or a tag from another tool.
- Body: the code is placed at the bottom of the page.
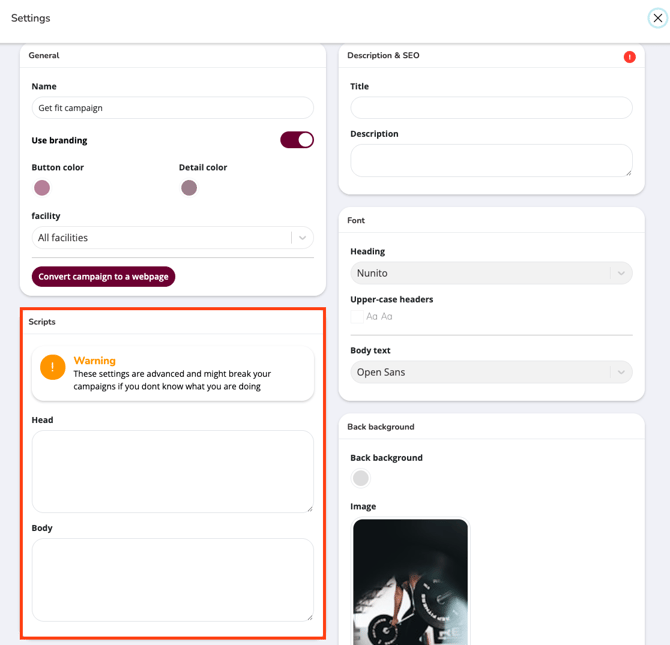
Here is what you should know:
- The code only applies to the campaign you add it to.
- If you want the same code on all campaigns, go to
Settings > Marketing huband fill in Head Script and Body Script under Campaigns. You can do this per location. That code runs before the campaign's own scripts. - The code runs for visitors who are not logged in. If you are logged in to Wondr, it only runs if you have permission to run scripts.
- The code runs exactly as you have written it. Wondr's cookie box does not control it. Make sure the code itself follows the visitor's cookie choice, or use Analytics instead.
- The scripts do not come along when you save the campaign as a template.
- You can also add code in the middle of the page with the Code block.
TIP! Use Analytics when you can. It handles cookie choices for you and gives you the statistics directly in the campaign overview. Use scripts for tools that Analytics does not support.
NOTE: Wrong code can make the campaign stop working or load slowly. Test the campaign with View after you have saved.
Check that it works
- Open the campaign with View in a new tab and check the texts, images and buttons.
- Check the campaign on mobile too.
- Check that the campaign is under Active in
Marketing hub > Campaigns. - After a few days: open the campaign overview and see if statistics are shown.
Troubleshooting
- I do not see the Create new button. You lack permission. Ask an Administrator for help.
- I cannot edit or remove a campaign. The campaign belongs to a location where you lack permission. You can still choose View and Copy.
- I cannot activate the campaign. If you have Marketing Hub GO, you can only have one active campaign. Finish the campaign that is active and try again, or upgrade to Pro or Hero.
- The visitor sees Page not found. The campaign is finished or removed. Click Reactivate campaign if it is finished.
- I do not see any statistics. Check that Analytics is activated under
Settings > Analytics, that the campaign is active and that Marketing hub - Page view is ticked. The text Activate analytics to see data reports means that Analytics is not on. Visits from people who have not accepted cookies are not counted. - I have sold memberships through the campaign but see no conversions. Conversions only count leads. Look in the report on sold memberships.
- My own tracking code does not work. Check that you have pasted the whole code into the right field, that you are logged out or have permission to run scripts, and that the campaign has been saved.
Related articles
- Read the article: Content blocks
Last updated: 16/11-2026