
NOTE: The schedule editor is for quick edits to single activities only. It cannot make changes across an entire chain of activities. If you need to change a whole chain, use the classic activity editor instead.
Table of Contents
Requirements
- The schedule editor is available in the weekly schedule view in
Schedule > Weekly Schedule, and works across the week, day, facility, and staff views. - The editor works on desktop and on touchscreens (tablet/mobile), with controls adapted for tapping instead of dragging where needed.
- The editor does not save anything until you review and confirm the changes in the save summary. Nothing is sent to the schedule until you click save.
- Moving, resizing, or deleting an activity that has a customer booked on it does not automatically cancel or notify the customer. You decide how each affected booking is handled before you save.
NOTE: To open the schedule editor, you need edit rights on activities. Without this, the edit pencil icon is not shown.
Usage instructions
Open the schedule editor
- Go to
Schedule > Weekly Scheduleand open the weekly view. - Click the pencil icon to enter edit mode.
- The grid zooms in and locks in place so it doesn't shift while you're editing, the Add to schedule panel opens, and the toolbar appears at the bottom of the screen.
Here is a quick overview of how you work in the quick edit mode:
TIP! You can switch between week, day, facility, and person view while you have unsaved changes. Your changes stay in place. You're only asked what to do with them when you try to leave edit mode entirely.
Add a new activity from the panel
- In the Add to schedule panel, use the search field or scroll the list to find the booking type you want to add. Each entry shows its name and default duration.
- Click the booking type. The toolbar at the bottom changes to "Click where [booking type] should go. Esc cancels."
- Move your mouse over the schedule. A preview block follows the cursor, snapped to the nearest 5 minutes, showing the day and start time it will land on.
- Click on the grid at the time you want. The activity is added there, for its default duration.
You can also add it in one motion: drag the booking type from the list and drop it directly onto the schedule at the time you want, instead of clicking it first and clicking again to place it.
TIP! Press Esc at any point to cancel placement without adding anything.
NOTE: If the panel is in your way, or you don't need it for the rest of the session, you can move it or get it out of the way:
- Move it: drag the panel's header to reposition it anywhere on screen.
- Minimize it: click the chevron in the top right of the panel's header to collapse it. Click it again to expand the panel back.
Move an activity
- Drag the activity to a new time, or to a different day.
- Drop it in place.
- The activity snaps to the nearest 5 minutes.
Open the activity afterwards to confirm the instructor, location, and other details moved with it.
Resize an activity
- Drag the top or bottom edge of the activity to shorten or extend it.
- The start time and length snap to 5-minute intervals, with a 15-minute minimum length.
Cut a floating activity in two
- Select the knife/cut tool in the toolbar.
- Click the point on the activity where you want to split it.
Each half must be at least 15 minutes long. Because of this, the cut tool only works on activities of at least 30 minutes. On a shorter activity, the tool is disabled entirely.
CAUTION: A cut cannot be undone once it's saved. While you're still in edit mode, you can undo and redo the cut as many times as you like, but after you save, the split is permanent and can't be reversed.
NOTE: The cut tool only works on floating booking types (for example Massage). You cannot cut a regular activity. If you hover over a regular activity with the scissors active, the pointer switches to the not-allowed cursor (a crossed-out circle) instead.
TIP! Press Esc to put the scissors away. This works even after you've selected the cut tool, not just to cancel placing a new activity.
Duplicate, delete, or change the type of an activity
- Hover over the activity to reveal its icons: duplicate, delete (×), and change type.
- Click duplicate to place a copy of it, or delete to remove it.
- Click change type to switch it to a different booking type. In the Change booking type panel that opens, search or scroll to find the type you want. The current type is highlighted and marked (Current). Click the new type to switch to it.
The activity keeps its time, day, and instructor when you change its type. Only the booking type changes.
NOTE: If you don't have delete rights, the delete icon isn't shown. The remaining icons stay evenly spaced, with no gap left where it would have been.
NOTE: Deleting an activity removes only that single activity, never the whole chain it belongs to. This is the same single-activity scope described at the top of this article, but worth repeating here: if you want to remove or change an entire chain of activities, use the classic activity editor instead.
Undo and redo
- Use the undo/redo controls in the toolbar to step backward or forward through your changes, or the keyboard shortcuts: Ctrl/Cmd+Z to undo, Ctrl/Cmd+Shift+Z to redo.
- This works for every action in the session (moves, resizes, cuts, duplicates, and deletes) until you save or discard
Review and save your changes
- Once you're done editing, click save.
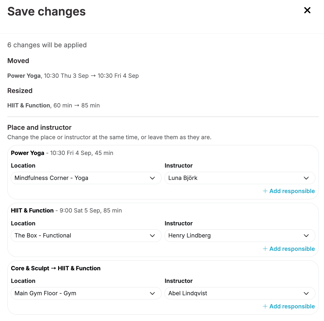
- The save summary sheet lists every change you made, with the correct new times.
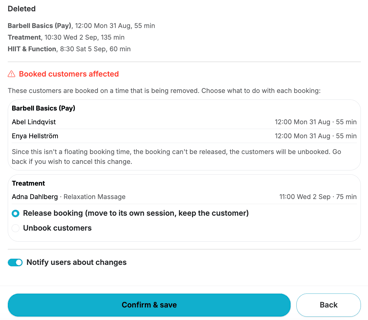
- If any change affects a customer's booking, the sheet asks you what to do with it (see below) before it lets you continue.
- Confirm to save. All changes are sent together in one batch.
TIP! Made a mistake partway through a long editing session? You don't need to start over: undo the specific change, or leave it out when you review the save summary.
Handle bookings on activities you've changed
If deleting or cutting an activity leaves a customer's booking without a slot, the save summary asks you, per booking, to choose:
- Release: creates a new activity of the same type at the booking's original time and moves the booking onto it. The booking keeps its order, payment, booked resources, and sub-type exactly as they were. It isn't cancelled and recreated, so the customer isn't notified or re-charged. Only available for bookable-time (floating) activities.
- Unbook: cancels the booking. You can choose whether to notify the customer; the notification, if sent, shows the activity's full start and end time.
NOTE: If the booking is on a regular (non-floating) activity, only Unbook is offered, with an explanation of why Release isn't available.
Until you decide, the affected booking is shown shaded ("pending") on the grid so it stays visible.
Assign instructors while editing
- Moving or resizing an activity keeps its existing instructor(s). You don't need to touch the instructor field unless you want to change it.
- Add a second instructor from the save summary with Add responsible. Instructors are kept in the order you add them.
- Replace one of several instructors by swapping them out in the save summary. The others stay as they are.
- If you've added several new activities in the same editing session, use "Use the first for all" in the save sheet to copy the location and instructor from the first one to all the others, instead of setting each one individually.
Use the schedule editor on a touchscreen
- Tap an activity to show its controls (move, duplicate, delete). Tap another activity to move the controls there, or tap empty space to deselect.
- Tap a booking type in the Add to schedule panel to place it, instead of dragging it. It's added within the hours currently visible on your screen.
- With the cut tool active, tap once on a floating activity to preview where the cut will land, then tap the same spot again to confirm the cut. Tapping elsewhere moves the preview line instead.
Troubleshooting & known issues
- Cut tool is greyed out / shows a not-allowed cursor: You're pointing at an activity that doesn't have bookable time slots. The cut tool only works on floating-booking activity types.
- Delete or add options are missing: Your account doesn't have delete or add rights on activities. Ask an administrator to grant
activities_delete/activities_addif you need them. - "The activities are too narrow to work in. Click a day heading above to edit that day on its own.": This isn't an error. On a busy week, the day columns can get too narrow to edit comfortably, and the editor tells you so. Click the heading of the day you want to work on to switch to that day's own view.
Related articles
Last updated: 31/08-2026