
Watch or read
- The video and this article show exactly the same things, in the same order.
- The video is in English. This article is also available in other languages. To read it in your language, choose it in the language menu at the top of the help center.
- Each part below shows where it starts in the video, so you can follow along in both.
You don’t need any earlier knowledge of Wondr. Everything starts from the member’s profile.
In this article
- Go to the member’s profile
- Open Add membership
- Choose a membership
- Customize a membership
- See the upcoming payments
- Edit a membership
- Terminate a membership
- Add a payment method
1. Go to the member’s profile
Video 0:00
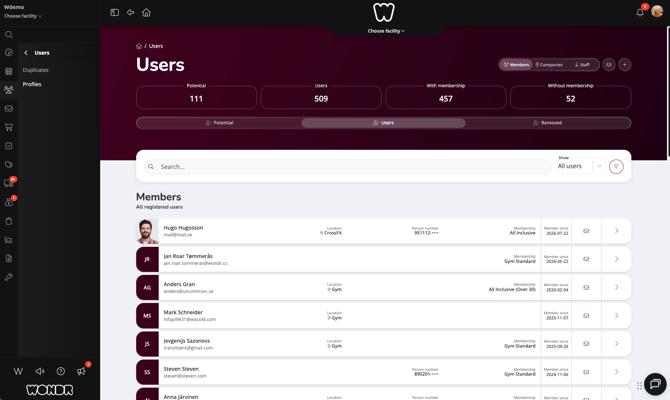
You sell a membership from the profile of the person who buys it. Go to Users > Profiles in the menu on the left. Find the person in the list and click them to open their profile.
2. Open Add membership
Video 0:33
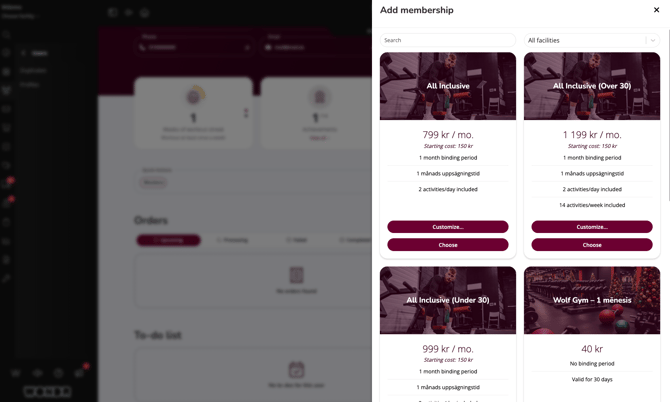
Scroll down to the Memberships box on the profile. Click the button at the top right of the box to open its menu. Under Add membership, choose the group the membership belongs to.
The Add membership window opens. It shows the memberships you can sell. Each card shows the monthly price, the starting cost, the binding period and what is included. Use Search or the All facilities list to find the right one.
3. Choose a membership
Video 0:37
Click Choose on a membership card to add it with its standard settings.
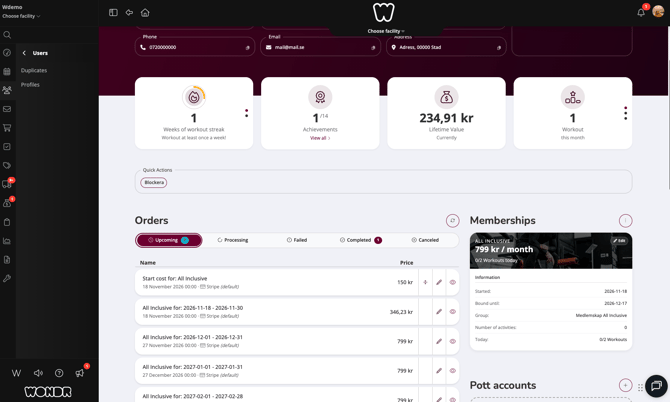
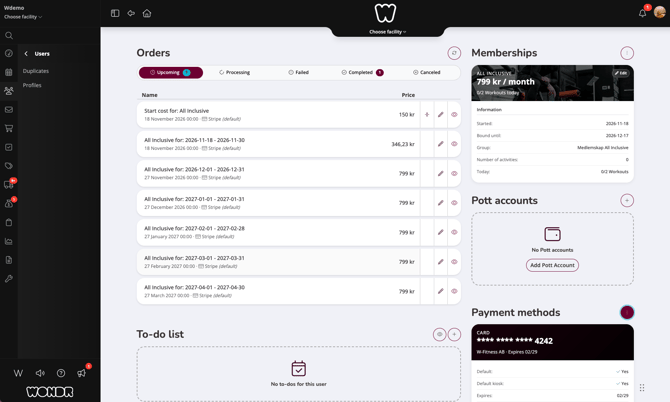
The membership now shows in the Memberships box. You see when it started, how long it is bound and which group it belongs to.
4. Customize a membership
Video 0:43
If you need other settings, click Customize... instead of Choose. Now you can change the membership before you add it:
Pricing: the starting cost, the cost per month and how often the person pays.Date: for example the starting date, when the binding period ends and which day of the month the person pays.Seller: the staff member who sold the membership.Other payer: clickChoose payerif someone else pays for the membership.
Preview of first payments shows the first payments with the settings you chose. The summary on the right also changes when you change something. Click Finish to add the membership, or Switch type to choose another membership.
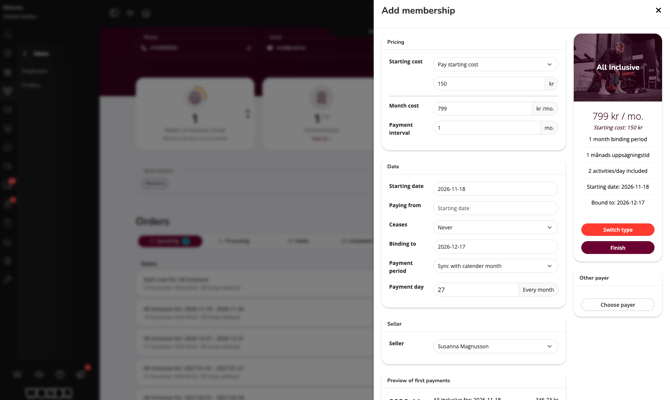
TIP! Check Preview of first payments before you click Finish, so you know what the person will pay.
5. See the upcoming payments
Video 1:12
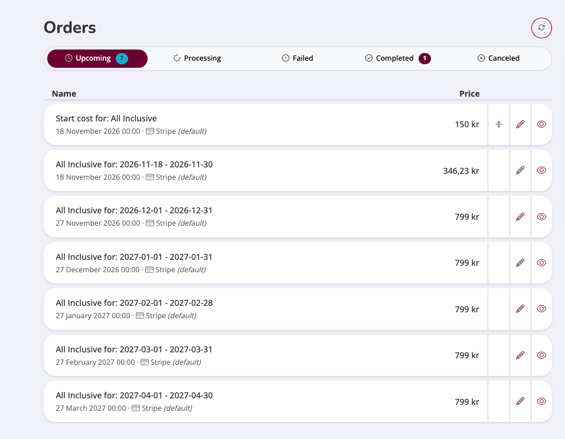
When the membership is added, its payments show in the Orders list under Upcoming. There is one order for the starting cost and one order for each month.
In the video, the first month order covers only the days left of that month, so it costs less than a full month.
6. Edit a membership
Video 1:20
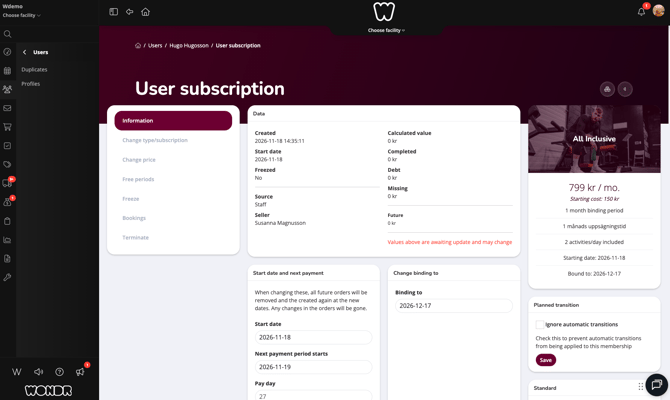
Click Edit on the membership in the Memberships box. The User subscription page opens.
The menu on the left lets you make changes, for example Change type/subscription, Change price, Free periods, Freeze and Terminate. Information shows the data about the membership, for example the start date, the source and the seller.
7. Terminate a membership
Video 1:32
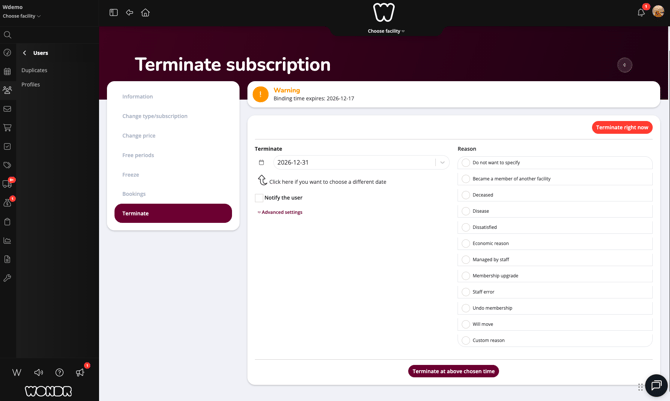
Click Terminate to end a membership. If the membership is still in its binding period, a warning shows when the binding time ends.
Choose the termination date and a Reason. Check Notify the user if the person should get a message about it. Then click Terminate right now. A message confirms that the termination date was set.
8. Add a payment method
Video 1:48
A member needs a payment method to pay automatically. If there is none, the orders show No payment method.
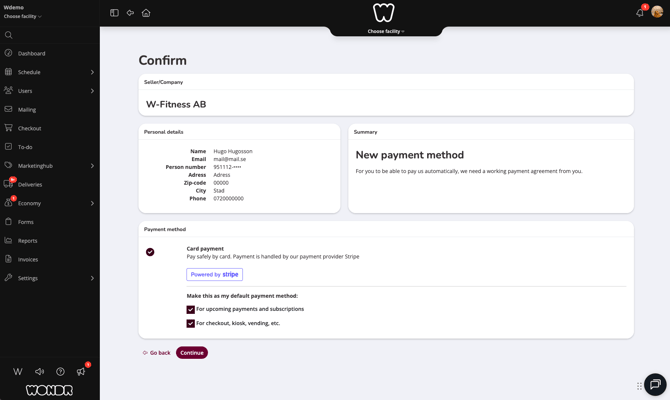
Click + in the Payment methods box. A Confirm page opens with the person’s details. Choose Card payment and check the box if it should be the default payment method. Click Continue.
A card form from the payment provider Stripe opens. The card details are filled in and saved. Back on the profile, a message confirms that the payment method was added.
9. Check the result
Video 2:20
The Payment methods box now shows the card. The orders show the new payment method, and the Activity timeline shows that the person started the membership.
NOTE: You only see the pages your role has access to. If you can’t find Users > Profiles, or you can’t add or change memberships, ask an administrator at your facility.
Words you will see
Membership
What the person buys to train at your facility, often paid every month.
Starting cost
A one-time fee the person pays when the membership starts.
Binding period
The time the person must keep the membership before it can end.
Order
A payment the person has made or will make, for example a monthly fee.
Payment method
How the person pays, for example with a card.
Terminate
To end a membership from a chosen date.
What’s next?
- Good to know
The next video in the education series. Use your new booking type in the schedule.